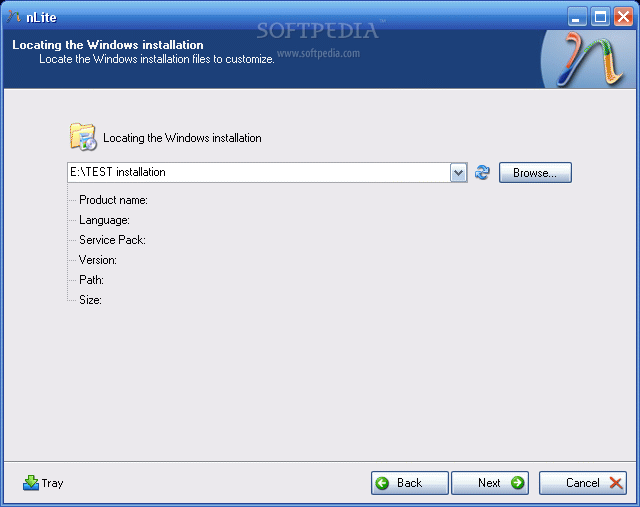
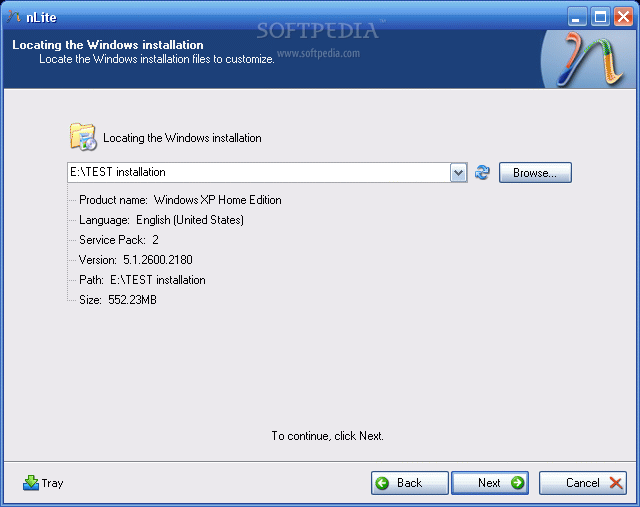
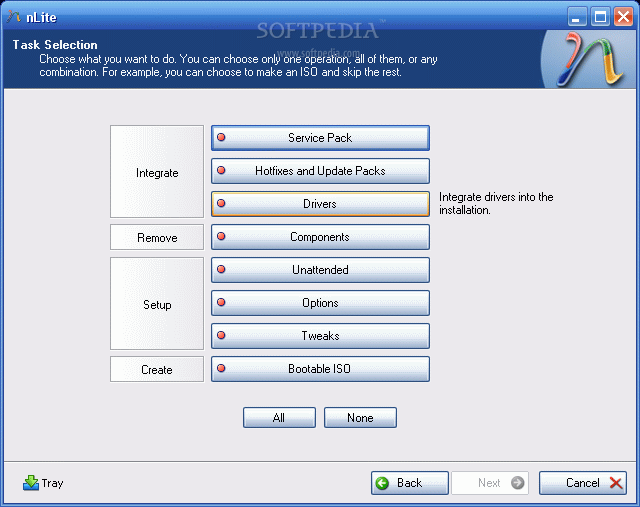
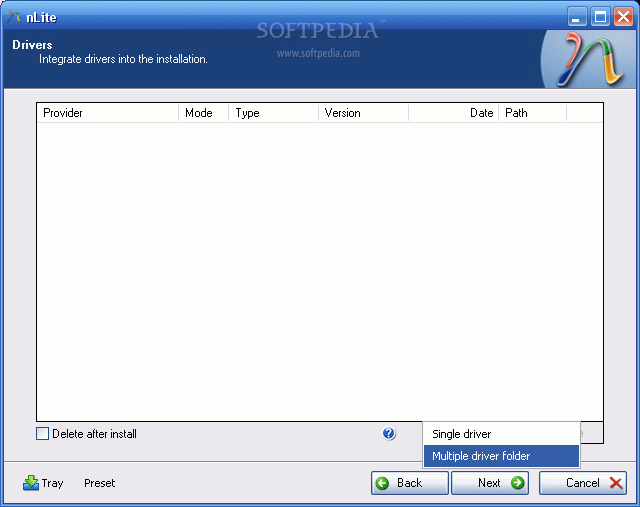
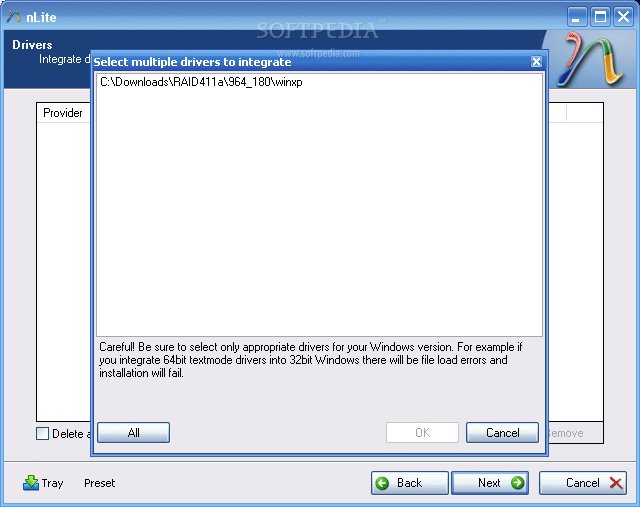
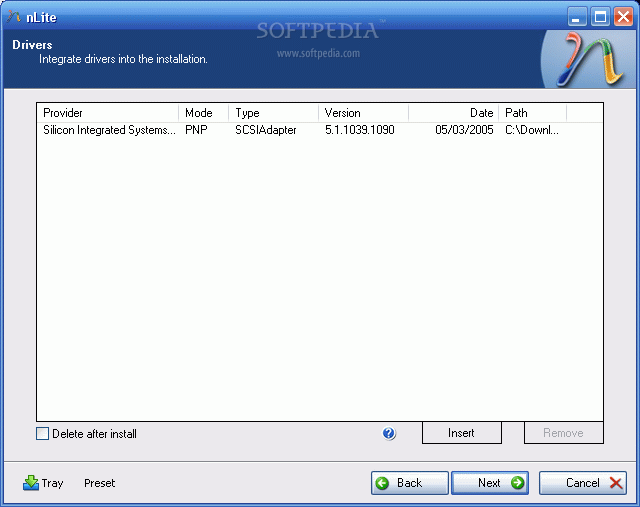
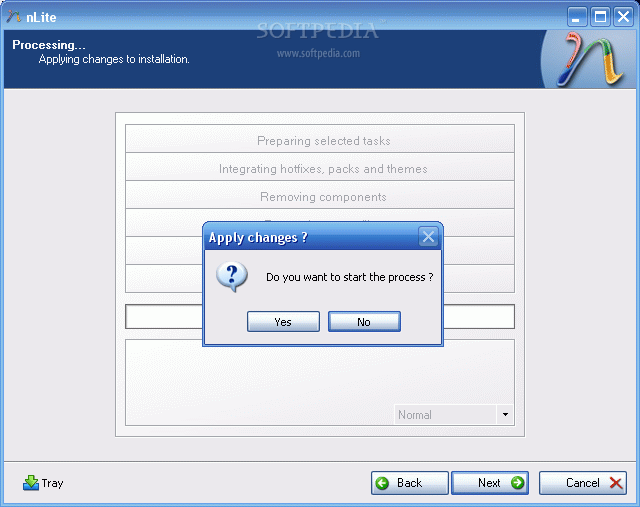
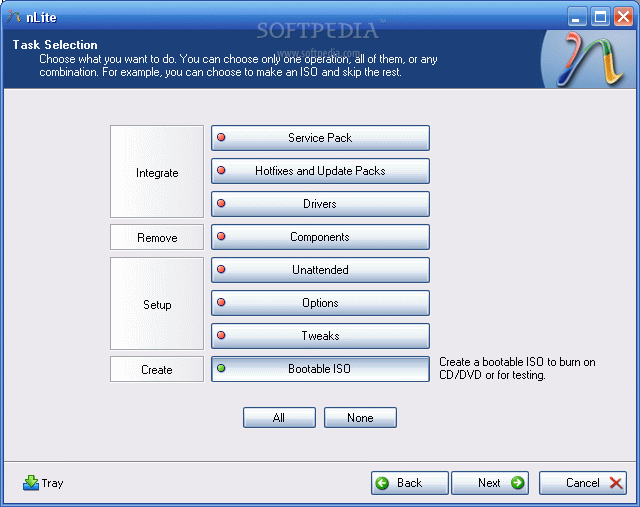
 SATA hard drives have become more and more appreciated tending to substitute the IDE drives due to the increasing speed they offer. Motherboard manufacturers started to implement the new standard years ago, when the technology was young and expensive. Now, as the SATA HDD prices have lowered to a level where anybody can afford to choose a SATA enabled HDD instead of an IDE one, a great migration has been observed among the common computer users. SATA hard drives have become more and more appreciated tending to substitute the IDE drives due to the increasing speed they offer. Motherboard manufacturers started to implement the new standard years ago, when the technology was young and expensive. Now, as the SATA HDD prices have lowered to a level where anybody can afford to choose a SATA enabled HDD instead of an IDE one, a great migration has been observed among the common computer users.They choose to install Windows and applications on SATA drives because they provide more speed which determines the system to run smoother. Thus, for those owning older mainboards with SATA support an extra step is required while attempting to install Windows XP. Windows XP does not provide drivers for all the SATA controllers, therefore, during the installation procedure, the user must insert a floppy with the drivers that came in the package along with the motherboard. Not a big deal, not much effort, but the funny thing is that a great number of people passed on their floppy drives. Under these circumstances, no floppy means the impossibility to install Windows XP on SATA (on some mainboards). The result? The installation guide simply won't detect the SATA HDD. People that were happy they got rid of the old removable drive have now motives to worry. Some may reconsider buying new floppy drives for their computers. Even if I wrote in a precedent article about the utility of the floppy drive, I do not encourage spending your money buying back an obsolete piece of hardware. I will present you a method to avoid this inconvenient by doing a software trick. Let's take it slow. Where is the problem? We have a driver problem strictly because the SATA driver we need does not come embedded in the Windows XP installation package. What if we add the driver by ourselves before installing Windows? What ingredients are involved in this operation? The original Windows XP Installation CD, a freeware application named NLite and a blank CD. Moreover, we need the drivers for the SATA controller provided by the manufacturer. In case you did not find any floppy inside the motherboard package or you cannot locate them on the mainboard installation CD, you can consult the manufacturer's website to download the latest versions. To do the trick I have been talking about, it is assumed that you already have a Windows installed on an IDE drive. In case you don't, pay a visit to a friend and ask him to let you use his computer. It won't take too much time, I guarantee. So, download the drivers and unzip them (in case they come archived) in a desired location. Then download and install the Nlite application. When you start the Nlite application, you will be asked to provide the location for the Windows installation package. Insert the genuine Windows Installation CD into the CD drive and, inside the application, select the CD drive letter. To insert the SATA drivers within the installation package, you need to have it saved on the HDD. Hence, when the warning window appears click OK and select the destination folder for the files to be saved. Make sure that the destination partition / HDD has enough space to store the contents of the installation CD. I tested a Windows XP Home Edition and it seems that it required about 566 MB. Immediately after you have chosen the destination folder, the application will start copying the Windows installation files. When finished, it will display some version information regarding the newly copied Windows Installation Package. Now, click next twice until you get to a screen where you get options sorted in 4 categories: Integrate, Remove, Setup, Create. We are interested in the integration procedure, therefore select the Drivers button and click next. From the next menu window, click Insert and select multiple drive folder option from the drop down menu. This option permits you to browse to the location where the downloaded drivers are found. Select the containing directory and click next. You will get a list with the available drivers (in case there are more than one) or simply one driver. Select it (them) and click next. Now the application will ask for the permission to start the integration procedure. Choose Yes and wait for the drivers to be inserted into the installation package.
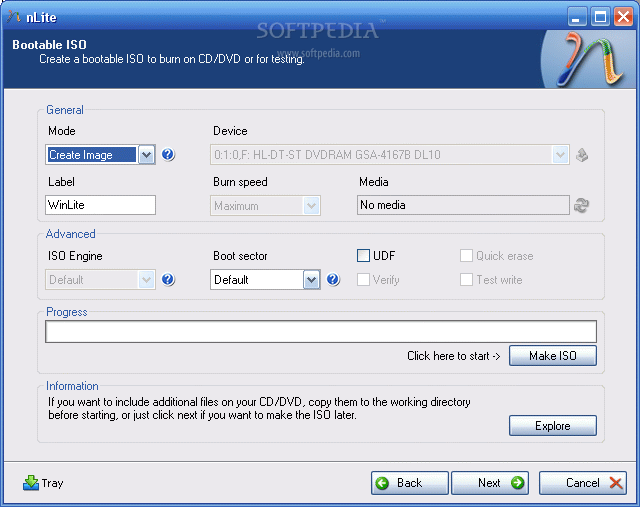
With problematic driver being included in the installation package you can install Windows XP on your SATA HDD...but...the installation package is on the HDD. You need a bootable CD in order to start an installation. Don't worry, once the installation package has been adorned with additional user selected drivers it can be transformed into a bootable disk image and later burned on a CD. To encapsulate the installation into a ISO image use the same Nlite application. Open it, make sure the HDD installation folder is selected and click next. Select "Last session" preset and click next again. Now from the options menu choose Bootable ISO and click next. In the following window, make sure that the mode is set to "Create Image" and click Make ISO. A destination folder is required where the resulting ISO image will be saved. Once the image saving process finished you have the freedom to burn it on a blank CD with whatever you favorite CD burner software may be.
The new CD will be the twin copy of the Windows Installation CD but with one difference, it includes the SATA driver. | ||||||||||||
Search This Blog
Showing posts with label install. Show all posts
Showing posts with label install. Show all posts
Thursday, September 10, 2009
Install Windows XP on SATA without a Floppy (F6)


Labels:
AHCI,
dell inspiron 1440,
ICH,
ICH9M,
install,
SATA,
Windows XP
Thursday, June 4, 2009
Compile Apache (with SSL), PHP 5 and MySQL on Linux
This article comes with a full reference on how to compile from source latest Apache 2.0.53 server, including support for SSL, PHP 5.0.3 as a module, and MySQL 4.1.10 database on a Linux. It was fully tested under SUSE Linux 9.1, SUSE Linux 9.2 and Fedora Core 3, but shall work with any Linux distribution (only on Debian you will have to change RPMs for proper deb packages).
Today, when almost every Linux distribution comes with a binary form of Apache 2.0.x, PHP 4.3.x and MySQL 4.0.x, it may seem a bit unnecessary to compile these, but, if you want some special configuration, latest components, or simply tune performance of your Apache, PHP and MySQL, compilation from source is the only possibility.
Basic system description:
PHP 5.0.3 will be compiled with support for: bz2, cpdflib, ctype, curllib, dom, ftp, gd2, freetype2, gettext, libiconv, libxml, mbstring, mysql, openssl, pcre, posix, session, SimpleXML, SPL, SQLite, tokenizer, xml, and zlib.
Apache 2.0.53 will be compiled with support for mod_access, mod_auth, mod_auth_digest, mod_deflate, mod_env, mod_headers, mod_setenvif, mod_ssl, mod_mime, mod_imap, mod_alias and mod_rewrite.
Compilation options:
Compilation can be customized by passing several parameters to gcc at runtime, for my Pentium-IV/HT/3.2GHz, this is a good starting set of parameters:
export CFLAGS="-march=pentium4 -mfpmath=sse -msse2 -O2 -pipe -s -fomit-frame-pointer"
You may get a list of gcc compilation options for your CPU at gcc.gnu.org.
All these scripts were fully tested under SESE Linux 9.1 with custom-built kernel 2.6.8.1 and Fedora Core 3 with custom-built kernel 2.6.9.1, and gcc version 3.3.3 / 3.4.2, but they shall work with any Linux distro (only on Debian you may need to change rpm packages for deb ones).
This manual assumes that all source files are located (downloaded to) /usr/local/src directory, SSL keys are placed into /home/ssl directory, and web root is located at /home/www directory.
Compile from source (Open) SSL:
- We will need OpenSSL library: openssl-0.9.7e.tar.gz
Compilation of OpenSSL:
su
cd /usr/local/src
tar -zxvf openssl-0.9.7e.tar.gz
cd openssl-0.9.7e
./config --prefix=/usr/local
make
make install
Create a private key and place it into directory /home/ssl:
mkdir /home/ssl
cd /home/ssl
/usr/local/bin/openssl genrsa -des3 -rand \
some_big_file_1:some_big_file_2 \
-out localhost.key 1024
Next, we will create a private key without a pass-phrase, this is less secure, but it allows us to bootup the server without manually entering the pass-phrase every time…
/usr/local/bin/openssl rsa \
-in localhost.key \
-out localhost.key.unsecure
We will also create a request file that will be emailed to proper certification authority for getting a trusted SSL certificate (if needed) under file localhost.key.csr:
/usr/local/bin/openssl req -new \
-key localhost.key \
-out localhost.key.csr
While waiting for the certification authority, we can create a temporary self-signed certificate, good for 30 days:
/usr/local/bin/openssl x509 -req \
-days 30 \
-in localhost.key.csr \
-signkey localhost.key \
-out localhost.cert
chmod 400 localhost.cert
chmod 400 localhost.key
chmod 400 localhost.key.unsecure
Compile MySQL 4.1.10 database from source:
- MySQL 4.1.10 source codes - mysql-4.1.10.tar.gz
- libtermcap library (most distros have it already) - libtermcap-2.0.8-35.i386.rpm
- libtermcap-devel library (most distros have it already) - libtermcap-devel-2.0.8-35.i386.rpm
MySQL 4.1.10 has a completely different communication protocol and associated PHP
mysqlifunctions. If your scripts were not designed for MySQL 4.1, you shall rather get MySQL release 4.0.23, to stay 100% compatible! Compilation options for MYSQL 4.0.23 will be the same, just remove one line withmysqlifrom PHP./configurescript.However for any new development, MySQL 4.1.10 is recommended.
Compiling MySQL from source, and creating user / group called mysql:
cd /usr/local/src
tar -zxvf mysql-4.1.10.tar.gz
cd mysql-4.1.10
./configure \
--prefix=/usr/local/mysql \
--with-unix-sock-path=/tmp/mysql.sock \
--with-charset=utf8
make
make install
groupadd mysql
useradd -g mysql mysql
cp support-files/my-medium.cnf /etc/my.cnf
cd /usr/local/mysql
bin/mysql_install_db --user=mysql
chown -R root  .
chown -R mysql var
chgrp -R mysql .
MySQL configuration file /etc/my.cnf can (for our local testing) look like this:
[client]
port = 3306
socket = /tmp/mysql.sock
[mysqld]
port = 3306
socket = /tmp/mysql.sock
skip-locking
key_buffer = 16K
max_allowed_packet = 1M
table_cache = 4
sort_buffer_size = 64K
net_buffer_length = 2K
thread_stack = 64K
skip-networking
server-id = 1
[mysqldump]
quick
max_allowed_packet = 16M
[mysql]
no-auto-rehash
[isamchk]
key_buffer = 8M
sort_buffer_size = 8M
[myisamchk]
key_buffer = 8M
sort_buffer_size = 8M
[mysqlhotcopy]
interactive-timeout
Compile from source Apache 2.0.53 web server:
Quite a few web-hosting companies still use Apache 1.3.x, but time of Apache 2.0 incompatibilities and problems is long gone, so 2.0 is a better choice now.
- We will need Apache 2.0.53 source codes - httpd-2.0.53.tar.gz
- RPM: libxml2 library (most distros have it already) - libxml2-devel-2.6.7-28.i586.rpm
- RPM: zlib library (most distros have it already) - zlib-devel-1.2.1-70.i586.rpm
- RPM: readline-devel library (most distros have it already) - readline-devel-4.3-306.i586.rpm
And compile it:
cd /usr/local/src
tar -zxvf httpd-2.0.53.tar.gz
cd httpd-2.0.53
./configure \
 --prefix=/usr/local/apache2 \
 --enable-so \
 --enable-auth-digest \
 --enable-rewrite \
 --enable-setenvif \
 --enable-mime \
 --enable-deflate \
 --enable-ssl \
 --with-ssl=/usr/local \
 --enable-headers
make
make install
Next we have to modify (alter) main Apache config file located at /usr/local/apache2/conf/httpd.conf (this also assumes your web root is located at /home/www):
DocumentRoot "/home/www"
And we well add support for PHP 5 (as a module):
LoadModule php5_module modules/libphp5.so
DirectoryIndex index.html index.htm index.php
AddType application/x-httpd-php .php
AddType application/x-httpd-php-source .phps
We also have to allow / create basic mod_rewrite rules:
Options Indexes Includes FollowSymLinks MultiViews
AllowOverride All
Order allow,deny
Allow from all
And dissalow clients to access .htaccess:
 Order allow,deny
 Deny from all
Next, if using SSL (on standard port 443), we will have to modify file /usr/local/apache2/conf/ssl.conf as follows (just replace the file content with this):
Listen 443

ServerName localhost
SSLEngine on
SSLCertificateFile /home/ssl/localhost.cert
SSLCertificateKeyFile /home/ssl/localhost.key.unsecure
Compile from source PHP 5.0.3:
For compiling PHP, we will need quite a few external libraries, like libcurl, libiconv, libjpeg, libpng, and few others, which we have to download and compile first:
- PHP 5.0.3 itself - php-5.0.3.tar.bz2
- CURL library - curl-7.12.1.tar.gz
- libiconv library - libiconv-1.9.2.tar.gz
- JPEG library: jpegsrc.v6b.tar.gz
- PNG library: libpng-1.2.8.tar.gz
- cpdflib library: clibpdf202r1.tar.gz
- Freetype 2 library: freetype-2.1.9.tar.bz2
Compile libiconv from source:
cd /usr/local/src
tar -zxvf libiconv-1.9.2.tar.gz
cd libiconv-1.9.2
./configure --prefix=/usr/local
make
make install
Compile libjpeg from source:
cd /usr/local/src
tar -zxvf jpegsrc.v6b.tar.gz
cd jpeg-6b
./configure --prefix=/usr/local
make
make install
make install-lib
Compile libpng from source:
cd /usr/local/src
tar -zxvf libpng-1.2.8.tar.gz
cd libpng-1.2.8
cp scripts/makefile.linux makefile
make
make install
Compile cpdflib from source:
cd /usr/local/src
tar -zxvf clibpdf202r1.tar.gz
cd ClibPDF/source
cp Makefile.Linux makefile
make
make install
Compile curl from source:
cd /usr/local/src
tar -zxvf curl-7.12.1.tar.gz
cd curl-7.12.1
./configure --prefix=/usr/local
make
make install
Compile freetype 2 from source:
cd /usr/local/src
tar -jxvf freetype-2.1.9.tar.bz2
cd freetype-2.1.9
./configure --prefix=/usr/local
make
make install
Next, we will compile PHP, with support for MySQL, iconv, curl, zlib, gd2, mbstring, SSL and many other modules:
cd /usr/local/src
tar -jxvf php-5.0.3.tar.bz2
cd php-5.0.3
./configure \
--with-apxs2=/usr/local/apache2/bin/apxs \
--with-mysql=/usr/local/mysql  \
--with-mysqli=/usr/local/mysql/bin/mysql_config  \
--with-mysql-sock=/tmp/mysql.sock \
--with-sqlite \
--enable-sqlite-utf8 \
--with-zlib \
--with-zlib-dir \
--with-bz2 \
--with-gd \
--enable-gd \
--enable-gd-native-ttf \
--with-jpeg-dir=/usr/local \
--with-png-dir=/usr/local \
--with-ttf \
--with-freetype-dir=/usr/local \
--with-iconv=/usr/local \
--with-curl=/usr/local \
--enable-track-vars \
--with-gettext \
--with-config-file-path=/usr/local/apache2/conf \
--enable-trans-id \
--enable-ftp \
--with-cpdflib=/usr/local \
--enable-mbstring \
--with-openssl=/usr/local
make
make install
cp php.ini-dist /usr/local/apache2/conf/php.ini
Next, we have to modify PHP configuration in file /usr/local/apache2/conf/php.ini, including basic PHP security settings:
mysql.default_socket = /tmp/mysql.sock
short_open_tag = Off
register_globals = Off
allow_url_fopen = Off
How to start Apache and MySQL at bootup?
The last thing left is to create a startup script, whitch will allow to run Apache and MySQL at bootup, automatically, so that we don’t have to do it manually. We will create a new file (for SuSE Linux 9.1, other ditros may vary here) /etc/init.d/web and set “executable” flag to it.
#! /bin/sh
#
# /etc/init.d/web
#
# (c) Radek HULAN
# http://hulan.info/
#
### BEGIN INIT INFO
# Provides:       apache-mysql
# Default-Start:  5
# Default-Stop:   5
# Description:    Starts Apache2 and MySQL 4
### END INIT INFO

case "$1" in
      start)
      /usr/local/apache2/bin/apachectl start
      /usr/local/mysql/share/mysql/mysql.server start
              ;;
      stop)
      /usr/local/apache2/bin/apachectl stop
      /usr/local/mysql/share/mysql/mysql.server stop
              ;;
      restart)
      /usr/local/apache2/bin/apachectl restart
      /usr/local/mysql/share/mysql/mysql.server restart
              ;;
esac
Next we will run YaST, section “System”, sub-section “Run level editor”, where we will enable service web for runlevel 3 and 5.
Testing the system?
First, start Apache and MySQL servers by entering:
/etc/init.d/web start
Next, create file /home/www/index.php with the following content:
In your browser, type URL http://localhost/ and https://localhost/, and if everything is installed fine, you will see a lot of information about your new Apache/PHP/MySQL installation.
phpMyAdmin:
We will also need phpMyAdmin to manage MySQL database, by entering http://localhost/db/ into our browser:
- phpMyAdmin 2.6.1 - phpMyAdmin-2.6.1.tar.bz2
Installation of phpMyAdmin into /home/www/db:
mkdir /home/www
cd /home/www
tar -jxvf /usr/local/src/phpMyAdmin-2.6.1.tar.bz2
ln -s phpMyAdmin-2.6.1 db
Next, we will configure phpMyAdmin’s advanced feaures, by modifying file /home/www/db/config.inc.php:
// URL to phpMyAdmin
$cfg['PmaAbsoluteUri'] = 'http://localhost/db/';

//connection settings
$cfg['Servers'][$i]['connect_type'] = 'socket';
$cfg['Servers'][$i]['extension'] = 'mysqli';

// user na password
$cfg['Servers'][$i]['auth_type'] = 'config';
$cfg['Servers'][$i]['user'] = 'root';
$cfg['Servers'][$i]['password'] = '';

// PMA settings
$cfg['Servers'][$i]['pmadb'] = 'phpmyadmin';
$cfg['Servers'][$i]['bookmarktable'] = 'pma_bookmark';
$cfg['Servers'][$i]['relation'] = 'pma_relation';
$cfg['Servers'][$i]['table_info'] = 'pma_table_info';
$cfg['Servers'][$i]['table_coords'] = 'pma_table_coords';
$cfg['Servers'][$i]['pdf_pages'] = 'pma_pdf_pages';
$cfg['Servers'][$i]['column_info'] = 'pma_column_info';
$cfg['Servers'][$i]['history'] = 'pma_history';
$cfg['Servers'][$i]['verbose_check'] = FALSE;

// persistent connections
$cfg['PersistentConnections'] = TRUE;

// do not display logo on the left
$cfg['LeftDisplayLogo'] = FALSE;

// show MySQL and PHP info
$cfg['ShowMysqlInfo'] = TRUE;
$cfg['ShowMysqlVars'] = TRUE;
$cfg['ShowPhpInfo'] = TRUE;

// show BLOBs
$cfg['ShowBlob'] = TRUE;
After everything is installed, use phpMyAdmin SQL window to run script /home/www/db/scripts/create_tables_mysql_4_1_2+.sql to create PMA tables, needed by phpMyAdmin.
Debugging PHP:
There are several tools, like PHPeclipse, which allow to debug PHP, in a full-featured IDE. In order to use PHPeclipse, you need to install PHP debugger first.
- Get Nusphere DBG: dbg-2.11.32-src.tar.gz.
Installation:
cd /usr/local/src
tar -zxvf dbg-2.11.32-src.tar.gz
cd dbg-2.11.32
./deferphpize
mkdir /usr/local/modules
cp modules/dbg.so /usr/local/modules
cp modules/dbg.la /usr/local/modules
Next, you will have to modify PHP configuration file located at /usr/local/apache2/conf/php.ini, add here:
; load debugger
extension_dir = "/usr/local/modules"
extension=dbg.so

; debugger configuration
[debugger]
debugger.enabled = true
debugger.profiler_enabled = true
debugger.JIT_host = localhost
debugger.JIT_port = 10001
debugger.JIT_enabled = on

; implicint flush - use only when debugging
implicit_flush = On
Do you need mod_perl as well?
Installation and compilation:
cd /usr/local/src
tar zxvf mod_perl-2.0-current.tar.gz
cd mod_perl-1.99_16
perl Makefile.PL MP_APXS=/usr/local/apache2/bin/apxs
make
make install
Next, you have to modify Apache configuration file located at /usr/local/apache2/conf/httpd.conf to load mod_perl, and set to use perl at directory /home/www/perl:
LoadModule perl_module modules/mod_perl.so
PerlModule Apache2
Alias /perl/ /home/www/perl/

  SetHandler perl-script
  PerlResponseHandler ModPerl::Registry
  PerlOptions +ParseHeaders
  Options +ExecCGI
Testing? Create file /home/www/perl/test.pl, issue chmod 755 test.pl on it, and type http://localhost/perl/test.pl in your browser to test your mod_perl installation.
#!/usr/bin/perl
print "Content-type: text/plain\n\n";
print "mod_perl 2.0 rocks!\n";
Subscribe to:
Posts (Atom)